A big reason a lot of people install Linux is for the extra security. While Ubuntu is a pretty secure operating system, new exploits and viruses are found every day. There are still a few simple steps you can take to secure your computer against intruders and internet exploits.
Anti-Virus is a pretty controversial topic on Linux. The popular belief is that Linux is by design immune to virues. Even though your Linux computer may not be infected, you can still host virus infected files. If you are downloading and sharing files via P2P, email or across your network with other Windows computers, anti-virus is essential. The method we take here will not consume vast amounts of system resources that slow your computer down, as is the case with most security suites on Microsoft Windows.
Regardless of operating system any computer connected to the internet should:
1) Install security updates automatically
2) Configure a firewall with a minimal set of rules
3) Install anti-virus software with updated virus definitions and regular scans
4) Protect their browser from XSS and link jacking exploits
This video will show you how to set up all of the above, simply, using only the Linux GUI. No terminal is needed.
This just scratches the surface of securing Ubuntu. Check back later for more advanced topics such as: port scan detection, brute force detection, application profiles, logging and more.
Showing posts with label Ubuntu. Show all posts
Showing posts with label Ubuntu. Show all posts
Sunday, October 10, 2010

Sunday, May 23, 2010
How to create a desktop wallpaper slideshow in Ubuntu Linux 10.04 (Lucid Lynx)
A popular feature in other OS's and one quite often requested in Linux, is the ability to cycle through a directory of images as your desktop background. Gnome and therefore Ubuntu actually do support this already and have for a long time, however its not easily configured in the GUI like setting a static wallpaper is.
If you go to your appearance preferences and change your background, you may notice a stack of images. This is the 'Cosmos' wallpaper. It is an XML file containing the paths to multiple images. To make your own slideshow, you need to copy this XML file and edit the image paths to the locations of the files you wish to display. Simple enough when you know how to do it, but a bit tedious to say the least.
Today I will show you step-by-step how to create and apply your own wallpaper slideshow, and to make it really easy for you I have created a utility to automate the process.
To use my program for automating this process:
1) Download 'Wallpaper Slideshow'
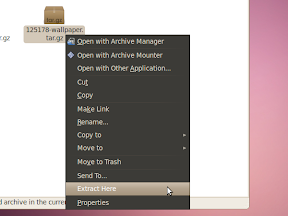
2) Extract the 125178-wallpaper.tar.gz
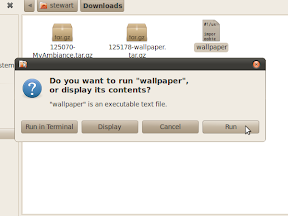
3) Double click 'wallpaper'
4) Click 'Run'
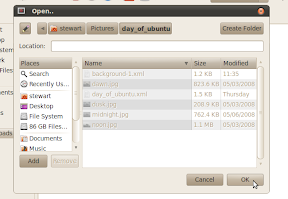
5) Select folder containing your pictures
6) Change the time to display each image and transition time (Optional)
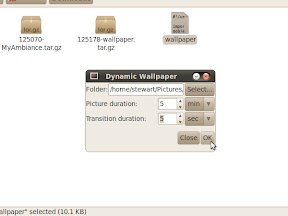
7) Click 'OK'
Hopefully Gnome will incorporate a similar utility directly into the Appearance preferences in future release.
If you go to your appearance preferences and change your background, you may notice a stack of images. This is the 'Cosmos' wallpaper. It is an XML file containing the paths to multiple images. To make your own slideshow, you need to copy this XML file and edit the image paths to the locations of the files you wish to display. Simple enough when you know how to do it, but a bit tedious to say the least.
Today I will show you step-by-step how to create and apply your own wallpaper slideshow, and to make it really easy for you I have created a utility to automate the process.
To use my program for automating this process:
1) Download 'Wallpaper Slideshow'
2) Extract the 125178-wallpaper.tar.gz
3) Double click 'wallpaper'
4) Click 'Run'
5) Select folder containing your pictures
6) Change the time to display each image and transition time (Optional)
7) Click 'OK'
Hopefully Gnome will incorporate a similar utility directly into the Appearance preferences in future release.
Tuesday, May 18, 2010
How to install proprietary codecs on Ubuntu Linux 10.04 (Lucid Lynx) Flash, MP3, DVD
Most Linux distributions, Ubuntu included, ship with only "free software". Not just free as in price, but free as in freedom. That is software that is free of patents, licensing restrictions, copyright restrictions and DRM (digital rights management), where the source is fully available for anyone to modify or extend. Free software has many benefits and in many cases, free software is of much greater quality than its proprietary or commercial counterparts.
Shipping without proprietary software, also means shipping without proprietary media codecs such as Mp3, AAC, Flash, Mpeg4 (DVD) or h.264 (HTML5, Blu-Ray and many others). Instead they come with codecs such as Ogg Vorbis and Flac for music and Theora for video. These are wonderful formats and I am lucky to have all my computers and devices running Linux so I can take full advantage of them. However, device support across the board is not so great, and for those less fortunate, or those just getting into Linux, who might have large collections of media stored in "bad" formats, their media will not play out-of-box on Linux. You may simply just wish to watch YouTube, play your own DVD's, or listen to music purchased online from the Ubuntu One Music store for instance, which also because of licensing constraints and even because of legal issues in some countries cannot be played on a fresh install of Linux.
Well have no fear, you can play pretty much anything on Linux, very easily, you don't even need to visit the terminal. Just follow my simple video below:
If you don't already have Flash installed and cannot watch the video here is what to do:
1) Open 'Software Center' from the Applications menu
2) Search for 'Ubuntu restricted extras' and click 'Install' then enter your password at the prompt -- the install may take some time, it is downloading and installing tons of media codecs
You now have support for most media except for playing back encrypted (commercial) DVD's, to add support for encrypted DVD's:
3) Press 'Alt' and 'F2' on your keyboard at the same time to bring up the run dialog
4) Type 'gksudo /usr/share/doc/libdvdread4/install-css.sh' and click 'Run' -- the command will run and you will not see a confirmation unless you check the 'Run in terminal' option, either way it will only take a few seconds
That's it, You can playback just about all of the popular media codecs in use today! Most people will can stop at this point.
So what about the more obscure formats? If you want to be able to play just about any format imaginable (and then some) there are just a few more steps. This is one of the few times that I will request you use a terminal, because it really is a much easier route to take.
1) Open a new terminal by going to your Applications menu, then Accessories and click 'Terminal'
2) Copy and paste the following command and press Enter:
5) Search for 'non-free codecs' and click 'Install'
Shipping without proprietary software, also means shipping without proprietary media codecs such as Mp3, AAC, Flash, Mpeg4 (DVD) or h.264 (HTML5, Blu-Ray and many others). Instead they come with codecs such as Ogg Vorbis and Flac for music and Theora for video. These are wonderful formats and I am lucky to have all my computers and devices running Linux so I can take full advantage of them. However, device support across the board is not so great, and for those less fortunate, or those just getting into Linux, who might have large collections of media stored in "bad" formats, their media will not play out-of-box on Linux. You may simply just wish to watch YouTube, play your own DVD's, or listen to music purchased online from the Ubuntu One Music store for instance, which also because of licensing constraints and even because of legal issues in some countries cannot be played on a fresh install of Linux.
Well have no fear, you can play pretty much anything on Linux, very easily, you don't even need to visit the terminal. Just follow my simple video below:
If you don't already have Flash installed and cannot watch the video here is what to do:
1) Open 'Software Center' from the Applications menu
2) Search for 'Ubuntu restricted extras' and click 'Install' then enter your password at the prompt -- the install may take some time, it is downloading and installing tons of media codecs
You now have support for most media except for playing back encrypted (commercial) DVD's, to add support for encrypted DVD's:
3) Press 'Alt' and 'F2' on your keyboard at the same time to bring up the run dialog
4) Type 'gksudo /usr/share/doc/libdvdread4/install-css.sh' and click 'Run' -- the command will run and you will not see a confirmation unless you check the 'Run in terminal' option, either way it will only take a few seconds
That's it, You can playback just about all of the popular media codecs in use today! Most people will can stop at this point.
So what about the more obscure formats? If you want to be able to play just about any format imaginable (and then some) there are just a few more steps. This is one of the few times that I will request you use a terminal, because it really is a much easier route to take.
1) Open a new terminal by going to your Applications menu, then Accessories and click 'Terminal'
2) Copy and paste the following command and press Enter:
echo "deb http://packages.medibuntu.org/ lucid free non-free" | sudo tee -a /etc/apt/sources.listwget -q http://packages.medibuntu.org/medibuntu-key.gpg -O- | sudo apt-key add - && sudo apt-get update5) Search for 'non-free codecs' and click 'Install'
Monday, May 17, 2010
How to change titlebar button location on Ubuntu 10.04 Lucid Lynx
Why did Canonical designers decide to put the title bar buttons on the totally unusable position of the left hand side? I can bet you a pretty big part of it is because Canonical has hired a new design team to work on the new branding, and they happen to all be using the totally unusable Macintosh OS X. While I'm not going to go into the details of the usability issues with LHS buttons vs RHS buttons or the politics of Canonical using Mac's to design Ubuntu, what I will do is show you how to change them back to the "Correct" location on the right hand side.
Like most things with Linux there are several ways to accomplish this (and without touching the terminal). You can:
1) Use gconf-editor
2) Use Ubuntu Tweak (which sets the gconf key for you)
3) Customize an existing RHS theme
However, all of these methods will reset back to the left the instant you go clicking around in your appearance preferences. If you want to make it stick and be able to switch themes at any time you will need a new theme. You can either download a theme or create one yourself very easily.
The video below will show you have to create a new RHS theme.
Now you have the benefit of keeping the default theme but with the button layout changed, and you can switch between LHS, RHS or any other theme as you wish, without having to reset your tweaks or gconf keys each time you change your appearance settings, which for most people means finding your old bookmark or searching Google to find those confusing instructions again.
If you are the type that would rather download the theme, I have made my customized theme available. As an added bonus, it also adds the application icon to the menu.
1) Download Ambiance (Right)
2) Go to the System menu and select Preferences > Appearance
4) On the 'Theme' tab, click the 'Install' button
5) Find '125070-MyAmbiance.tar.gz' in your Downloads folder and click 'Open'
6) Select the 'MyAmbiance' theme from the list
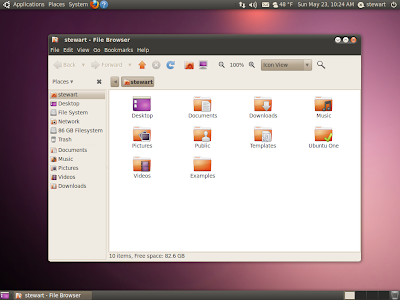
At least those designers only job is the artwork. I would hate to see Gnome's Nautilus suffer to the lackluster usability of Apple's Finder.
Like most things with Linux there are several ways to accomplish this (and without touching the terminal). You can:
1) Use gconf-editor
2) Use Ubuntu Tweak (which sets the gconf key for you)
3) Customize an existing RHS theme
However, all of these methods will reset back to the left the instant you go clicking around in your appearance preferences. If you want to make it stick and be able to switch themes at any time you will need a new theme. You can either download a theme or create one yourself very easily.
The video below will show you have to create a new RHS theme.
Now you have the benefit of keeping the default theme but with the button layout changed, and you can switch between LHS, RHS or any other theme as you wish, without having to reset your tweaks or gconf keys each time you change your appearance settings, which for most people means finding your old bookmark or searching Google to find those confusing instructions again.
If you are the type that would rather download the theme, I have made my customized theme available. As an added bonus, it also adds the application icon to the menu.
1) Download Ambiance (Right)
2) Go to the System menu and select Preferences > Appearance
4) On the 'Theme' tab, click the 'Install' button
5) Find '125070-MyAmbiance.tar.gz' in your Downloads folder and click 'Open'
6) Select the 'MyAmbiance' theme from the list
At least those designers only job is the artwork. I would hate to see Gnome's Nautilus suffer to the lackluster usability of Apple's Finder.
Tuesday, May 11, 2010
Debunking Linux #2: A Tour of Ubuntu Linux
One of the most common things I hear about Linux is that "It doesn't do anything" or "To do anything you are required to type a bunch of commands in the terminal". This spawns likely from 2 things:
1) From the infancy of the GUI in the mid-late '90s. But what was it pitted against? Windows 95 and Windows 98 in the Windows camp, and System 7 and System 8 on the Mac side of things (if you want to even consider a Mac side existed in that period before Microsoft bailed out Apple). The Linux GUI at the time consisted of windowing toolkits left over from Unix which was heavily console based. Gnome hadn't reached version 1 yet and KDE was not even a sparkle in someones eye. Would you still compare the latest OS X to Windows 95? Hell, I would even argue that the Windows 95 GUI was more functional then than the OS X of today! But that's may be a topic for another time. So why do people still compare the '70s Unix desktop to the Linux desktop of the 2010s? Because, either they haven't bothered to take a look at a recent release or have never bothered to look personally at any release and are just repeating the F.U.D they read online.
2) Because a lot of online documentation and tutorials reference how to do things via a terminal. There is nothing wrong with this, the terminal is easily accessed and very powerful. Often times it is much quicker to type a command (or copy and paste if you are following a guide), than it is to interact with a GUI. And it is definitely a lot easier to walk someone through a one line command than to try to explain to them every single mouse movement, button press and keystroke in a GUI and having to use outlined screenshots and videos to convey your information.
Ubuntu Linux 10.04 LTS (Lucid Lynx) was just released on April 29. It is a modern Linux distribution and features the latest Gnome Desktop for its user interface. They both follow a strict 6 month release cycle between releases and almost daily updates between releases. This ensures your computer is always up to date with the latest bug fixes, security enhancements and new features available. No more waiting 6 years between OS releases only to get a new theme and new hardware incompatibilities. This release adds two new themes (with a high resemblance to OS X), faster boot up and shutdown speeds, social networking integration, better desktop integration with Ubuntu One giving you 2GB of free cloud storage, a new Music Store and a lot more.
In the last Debunking Linux we looked at how fast and easy it is to install Ubuntu. Today we will look at what you get by default when you install it. The following video contains only software installed by default. The only setup done prior is installing video drivers, setting up email, chat and broadcast accounts and setting location. All of this is done easily using the menus on the top right of the screen. Also MP3 support was installed which you are prompted to install the first time you open Rhythmbox or access the Ubuntu One Music Store. Warning, the video moves very fast but it is the best I could do trying to cram so many features into the 10 minute constraints of YouTube.
Here is a list of what we just saw:
1) Installing software through the Ubuntu Software Center
2) Installing updates to all of your software through the Update Manager
3) Check and compose Email, Manage your to-do list and calendar and Send out meeting invitations with Evolution
6) Integration to chat and broadcast accounts with all your favorite social sites
7) Communicating with friends in chat and Facebook/Twitter with Empathy and Gwibber
8) Watch a DVD with Totem
9) Import music from CD, Copy music to and from an iPod, Listen to social radio, and browse the Ubuntu One Music Store from Rhythmbox
10) Import, Manage, Edit and Export photos with F-Spot
11 Open Word documents, Powerpoint presentations and Excel spreadsheets with OpenOffice.org and PDF's with Evine
12) Tabbed file browsing, two-pane browsing and connecting to network shared folders with Nautilus
13) Watch YouTube with Firefox and Totem
14) Manage your windows and organize your desktop with virtual desktops
15) Customize your themes and appearance
That is a lot of functionality there, right out of the box, without ever having to visit the terminal to enter a command. There is so much more that I didn't have time to include such as:
1) Creating slideshows and dvd's
2) Creating home movies and uploading them to YouTube or Facebook
3) Synchronizing your files, contacts, bookmarks, notes and music between your computers using Ubuntu One cloud storage
4) Connecting remotely to Windows, Mac or Linux computer with RDP or desktop sharing
5) Central account management and secure storage of keys and passwords
6) Advanced desktop management and desktop effects
7) Using Linux to clean or restore your broken or virus infected Windows OS
And this just barely scratches the surface of what is possible when you install additional software and customize your desktop. We will visit some of these features in more depth in following Debunkings and How-To's.
So what do you think? Is Linux a viable desktop alternative? Are tasks easy to accomplish without resorting to the terminal? Does the desktop environment look and act as you would expect a modern computer to? Are there other features you would like me to cover in the future? Use the comment button below to communicate with me.
1) From the infancy of the GUI in the mid-late '90s. But what was it pitted against? Windows 95 and Windows 98 in the Windows camp, and System 7 and System 8 on the Mac side of things (if you want to even consider a Mac side existed in that period before Microsoft bailed out Apple). The Linux GUI at the time consisted of windowing toolkits left over from Unix which was heavily console based. Gnome hadn't reached version 1 yet and KDE was not even a sparkle in someones eye. Would you still compare the latest OS X to Windows 95? Hell, I would even argue that the Windows 95 GUI was more functional then than the OS X of today! But that's may be a topic for another time. So why do people still compare the '70s Unix desktop to the Linux desktop of the 2010s? Because, either they haven't bothered to take a look at a recent release or have never bothered to look personally at any release and are just repeating the F.U.D they read online.
2) Because a lot of online documentation and tutorials reference how to do things via a terminal. There is nothing wrong with this, the terminal is easily accessed and very powerful. Often times it is much quicker to type a command (or copy and paste if you are following a guide), than it is to interact with a GUI. And it is definitely a lot easier to walk someone through a one line command than to try to explain to them every single mouse movement, button press and keystroke in a GUI and having to use outlined screenshots and videos to convey your information.
Ubuntu Linux 10.04 LTS (Lucid Lynx) was just released on April 29. It is a modern Linux distribution and features the latest Gnome Desktop for its user interface. They both follow a strict 6 month release cycle between releases and almost daily updates between releases. This ensures your computer is always up to date with the latest bug fixes, security enhancements and new features available. No more waiting 6 years between OS releases only to get a new theme and new hardware incompatibilities. This release adds two new themes (with a high resemblance to OS X), faster boot up and shutdown speeds, social networking integration, better desktop integration with Ubuntu One giving you 2GB of free cloud storage, a new Music Store and a lot more.
In the last Debunking Linux we looked at how fast and easy it is to install Ubuntu. Today we will look at what you get by default when you install it. The following video contains only software installed by default. The only setup done prior is installing video drivers, setting up email, chat and broadcast accounts and setting location. All of this is done easily using the menus on the top right of the screen. Also MP3 support was installed which you are prompted to install the first time you open Rhythmbox or access the Ubuntu One Music Store. Warning, the video moves very fast but it is the best I could do trying to cram so many features into the 10 minute constraints of YouTube.
Here is a list of what we just saw:
1) Installing software through the Ubuntu Software Center
2) Installing updates to all of your software through the Update Manager
3) Check and compose Email, Manage your to-do list and calendar and Send out meeting invitations with Evolution
6) Integration to chat and broadcast accounts with all your favorite social sites
7) Communicating with friends in chat and Facebook/Twitter with Empathy and Gwibber
8) Watch a DVD with Totem
9) Import music from CD, Copy music to and from an iPod, Listen to social radio, and browse the Ubuntu One Music Store from Rhythmbox
10) Import, Manage, Edit and Export photos with F-Spot
11 Open Word documents, Powerpoint presentations and Excel spreadsheets with OpenOffice.org and PDF's with Evine
12) Tabbed file browsing, two-pane browsing and connecting to network shared folders with Nautilus
13) Watch YouTube with Firefox and Totem
14) Manage your windows and organize your desktop with virtual desktops
15) Customize your themes and appearance
That is a lot of functionality there, right out of the box, without ever having to visit the terminal to enter a command. There is so much more that I didn't have time to include such as:
1) Creating slideshows and dvd's
2) Creating home movies and uploading them to YouTube or Facebook
3) Synchronizing your files, contacts, bookmarks, notes and music between your computers using Ubuntu One cloud storage
4) Connecting remotely to Windows, Mac or Linux computer with RDP or desktop sharing
5) Central account management and secure storage of keys and passwords
6) Advanced desktop management and desktop effects
7) Using Linux to clean or restore your broken or virus infected Windows OS
And this just barely scratches the surface of what is possible when you install additional software and customize your desktop. We will visit some of these features in more depth in following Debunkings and How-To's.
So what do you think? Is Linux a viable desktop alternative? Are tasks easy to accomplish without resorting to the terminal? Does the desktop environment look and act as you would expect a modern computer to? Are there other features you would like me to cover in the future? Use the comment button below to communicate with me.
Monday, April 19, 2010
Debunking Linux #1: Installing Ubuntu Linux
There are a lot of myths and fallacies surrounding Linux that I hear daily. These myths definitely slow the adoption of Linux by filling the heads of potential users with false information and flat out lies. This is the first of several debunking and how-to blogs I will do to lay some of this mis-information to rest. I hope to do so in a way to does not come across as fanboy-ish. To do this, I will shy away from direct comparisons to other operating systems where it is not relevant and only present the facts through words and related videos. So let's get started.
A myth often heard online is that installing Linux is hard if you don't have a doctrine in computer science, or rather, it's not for the faint of heart. This myth probably stems from it's early days where you had to know a little bit about your hardware to do the install which used an install wizard through the Linux terminal. Even then, if you knew whether your keybord/mouse were serial, at or ps2, and you knew your graphics cards chipset you could do it. Probably the worst part was identifying your monitor refresh rates, which were often published in the manuals or online.
Fast forward to 2010 and Linux is so easy to install, the ability to click a mouse button is the only prerequisite. Not convinced? Here is a short video walkthrough of installing Ubuntu Linux 10.04 (Lucid).
So ready to give it a try? First you will need to Get Ubuntu. You can either download a free ~700MB CD image and burn it to a blank CD or have Canonical send you an installation CD by mail absolutely free, you don't even pay the shipping.
When you have your CD in hand, stick it in your cd tray and reboot your computer. Most Linux distributions come with what is called a Live CD where you can run Linux directly from the CD without affecting your currently installed OS. When you remove the CD and reboot, your computer remains completely untouched. This is a great way to just try it out and take a tour. However, it may not support all of your hardware, may not have all the software you want to test and desktop effects more than likely will not be enabled. As well, the speed of running it from CD will be slow. This is not an optimal experience, but it does give you a little taste without commitment. To enter Live CD mode, click the 'Try Ubuntu' button from the first screen when the CD boots (as seen in the video above).
Another popular choice is called Wubi. This can also be found on your CD when booted to Windows. Executing Wubi.exe will allow you to install Ubuntu as a Windows application and allow you to easily dual boot between the two. Using this method you can experience Ubuntu as an (almost) native install. It can be uninstalled if you wish at any time from the Windows Add/Remove software control panel without any permanent changes to the computer.
The best way to experience it however is to install it natively as the only OS on your computer or as a true dual-boot with Windows or OS X. To install Ubuntu, stick the CD in the drive tray and boot it, then select the 'Install Ubuntu' button and follow the very simple 6 step wizard based installer. All of your hardware will be automatically detected and configured and you will have a fully functioning Linux computer in 10 - 15 minutes.
So is installing Linux hard? Absolutely not, in fact it is one of the quickest and easiest operating systems to install.
Check back later for a tour of the Ubuntu Linux desktop and for future myths debunked and how-to's.
A myth often heard online is that installing Linux is hard if you don't have a doctrine in computer science, or rather, it's not for the faint of heart. This myth probably stems from it's early days where you had to know a little bit about your hardware to do the install which used an install wizard through the Linux terminal. Even then, if you knew whether your keybord/mouse were serial, at or ps2, and you knew your graphics cards chipset you could do it. Probably the worst part was identifying your monitor refresh rates, which were often published in the manuals or online.
Fast forward to 2010 and Linux is so easy to install, the ability to click a mouse button is the only prerequisite. Not convinced? Here is a short video walkthrough of installing Ubuntu Linux 10.04 (Lucid).
So ready to give it a try? First you will need to Get Ubuntu. You can either download a free ~700MB CD image and burn it to a blank CD or have Canonical send you an installation CD by mail absolutely free, you don't even pay the shipping.
When you have your CD in hand, stick it in your cd tray and reboot your computer. Most Linux distributions come with what is called a Live CD where you can run Linux directly from the CD without affecting your currently installed OS. When you remove the CD and reboot, your computer remains completely untouched. This is a great way to just try it out and take a tour. However, it may not support all of your hardware, may not have all the software you want to test and desktop effects more than likely will not be enabled. As well, the speed of running it from CD will be slow. This is not an optimal experience, but it does give you a little taste without commitment. To enter Live CD mode, click the 'Try Ubuntu' button from the first screen when the CD boots (as seen in the video above).
Another popular choice is called Wubi. This can also be found on your CD when booted to Windows. Executing Wubi.exe will allow you to install Ubuntu as a Windows application and allow you to easily dual boot between the two. Using this method you can experience Ubuntu as an (almost) native install. It can be uninstalled if you wish at any time from the Windows Add/Remove software control panel without any permanent changes to the computer.

The best way to experience it however is to install it natively as the only OS on your computer or as a true dual-boot with Windows or OS X. To install Ubuntu, stick the CD in the drive tray and boot it, then select the 'Install Ubuntu' button and follow the very simple 6 step wizard based installer. All of your hardware will be automatically detected and configured and you will have a fully functioning Linux computer in 10 - 15 minutes.
So is installing Linux hard? Absolutely not, in fact it is one of the quickest and easiest operating systems to install.
Check back later for a tour of the Ubuntu Linux desktop and for future myths debunked and how-to's.
Subscribe to:
Posts (Atom)
